Showing posts with label pin loom patterns. Show all posts

Saturday, February 4, 2023

A Classic Pin Loom Felted Winter Hat

Ann H. is a fellow Minnesotan who shared the story of her long involvement with pin looms, including all the details for making this very classic (double-layered reversible felted) pin loomed hat. You will find a diagram and complete directions for making the hat below. 


Ann has been working in fiber, including deep dives into natural dyes and various forms of weaving, since the 60's. She noted that her pin loom hat came from a magazine at that time. 
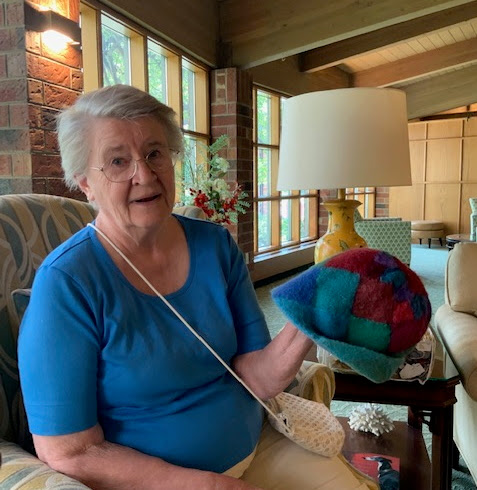
She decided to make the hat using some of her incredible selection of naturally dyed wool samples. As you can see she still possesses a whole wreath of samples, each tagged with the dye and mordant that she used to create them.  

As a side note, I believe that I should get a few extra "good life" points for not being tempted to grab the wreath of samples at the end of the interview and run away. Okay, I was a little bit tempted... but I didn't do it. 

Ann noted that she has worn her reversible, felted hat each winter for at least 40 years. It's very warm and comfy and just doesn't wear out. 
I believe that this is the grail of pin loomed hats, the fabled pattern that I have heard about over the years and could never find. 


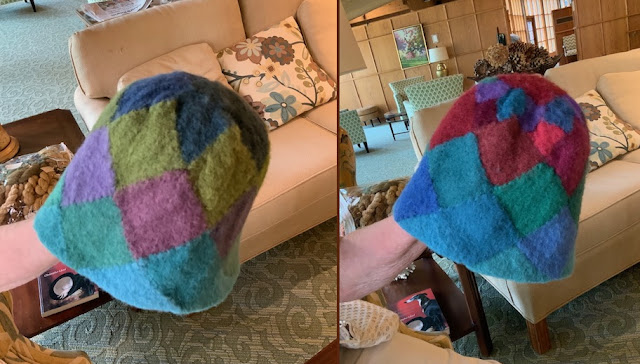
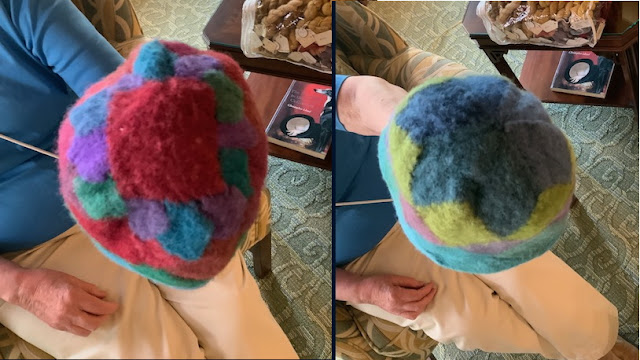
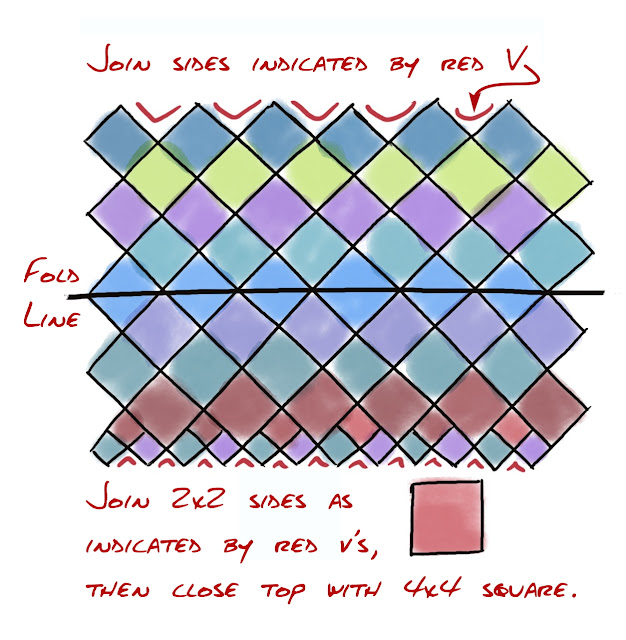
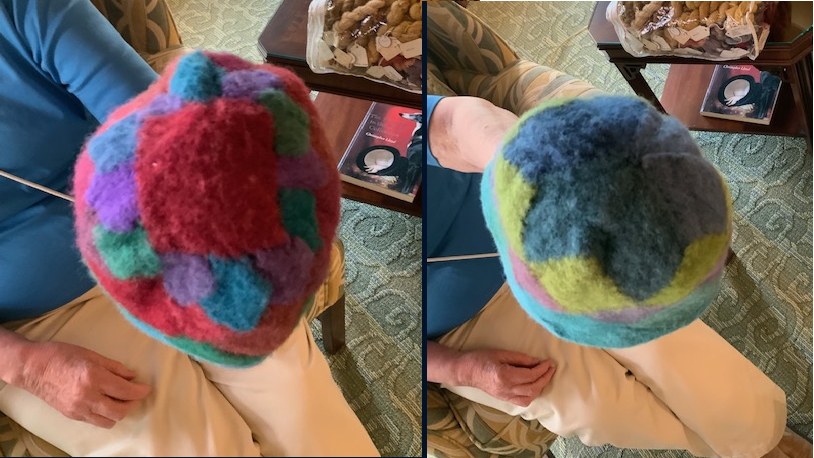
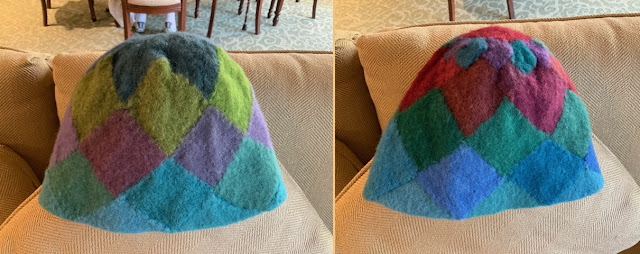
Here are the important pictures for recreating this classic hat. It is completely reversible, you are seeing both sides of the hat. The two ends of the hat are constructed differently. The blue end consists of six 4x4 squares stitched into a star and tightly felted. The red end consists of twelve 2x2 squares topped with a 4x4 square. 

This classic pin loom hat is made with 49 large squares and 18 small squares. Choose a yarn that will felt well. 
  • The hat is made with 49 - 4x4 wool pin loom squares and 18 - 2x2 wool squares. 
  • Join the squares (I would suggest using the double overcast stitch) to create a tube with the right side out. 
  • Join the squares at the ends of the tube to close the ends as shown in the pictures above. 
  • Fold the closed tube in on itself to create a very large double-sided, reversible hat. 
Now comes that essential step of felting the hat. Ann noted that before she started the felting process, she went through her cupboards and tried a number of different mixing bowls on her head, finally finding one that best fit her head size. These days we also have the option to use a foam mannequin head as a form for the hat. 

Ann felted the hat by hand, using hot water and Woolite. She noted that the felting took quite a while because it was essential to put extra work into the ends in order to shrink them down to a tight, rounded shape. She turned the hat both ways in order to work both sides evenly. Every so often she would stop and try her hat on the mixing bowl, finally stopping when the hat fit snugly over the mixing bowl. 


And here it is, the classic pin loom hat. Now that I have a handle on the pattern I am definitely going to make one. I realize that I could make the hat using just one of the styles on the ends, but I think that I am going to be so curious about the hat that I will want to recreate the two different ends. 


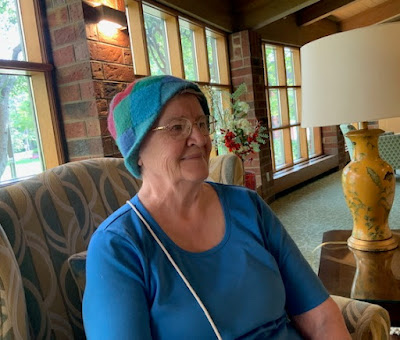
My hat won't be made with hand dyed natural colors, that's beyond my skill level. But I am going to think about what colors I would love most...

Because, let's face it, this hat could last another 50 years!

Please let me know if you are tempted to create this classic hat, too. Or if you already have one in your weaving collection. 

Happy weaving!
Margaret Stump

Sunday, December 26, 2021

Finally!! Pin Loom Mini Sweaters for 2021

Thanks to Florencia and to the many weavers who shared their mini-sweaters, we have another fabulous field of pin loom creativity. Many thanks to everyone who took part. 


My new mini sweater plan is to begin now and start making mini sweaters any time I find that I have woven the wrong size or an unneeded square. With any luck I shall have the start of a new Christmas ornament tradition. They may not be as wonderful as the creations above, but it should be a lot of fun. 


How to participate

Grab your 4x4 loom and start weaving your mini sweater! The only requirement is that you do it only using four 4" x 4" squares. You can use any type of yarn you like with encouragement to use the leftovers that you or your friends already have at home. 

How to make a mini sweater

No need to be a pin loom expert. Follow the step by step instructions below or check out Florencia's PDF with everthing you need to know. 

How to send your designs

Place each sweater on a white piece of paper and take a picture straight from above. Try to take each picture with daylight and send them in a good quality .jpg file (150 dpi min) to: florencia.campos@ullvuna.cl

Deadline

Florencia will be gathering pictures through December 18. We will publish a large picture of all of the mini sweaters on December 20.


If you are anything like me (or like Gary, my Mini Sweater model) you have been waiting on tenderhooks for the next Mini Sweater Pin Loom Day. 

The theme this year is gathering up and using all those tiny scraps of fabulous yarn-- to good to throw out, too small to use on anything but a Mini Sweater.  Gather them up and make one... or two... or a whole Christmas tree-full of Mini Sweaters. 

Use this link to find a downloadable PDF in English and Spanish with complete directions from Florencia Campos Correa on making Mini Sweaters.

Keep in mind that the basic sweater is easy to do, using four 4" squares to create the cutest little sweater. Weave them using the 3 layer method or add extra levels of design by weaving every line using the two layer method. 


Don't forget that deadline, send your mini sweater pictures to Florencia at florencia.campos@ullvuna.cl by December 18.    
Every year the sweaters get better. I can't wait to see yours!

Friday, December 3, 2021

Hanging Out with Hazel Rose

A long time ago... or at least it seems like a long time ago (before Covid) I used to go to fiber conferences. I would often teach classes, have a booth, sell pin loom items and books, and just generally hang around with other weavers. It was wonderful. My very favorite conference was the Oregon Flock and Fiber Fair because I could go visit my daughter in Oregon and because Hazel and Randy Spencer, owners of Hazel Rose Looms always came to that conference, too. 

I can't tell you how great it was to see her booth because, quite honestly, it's a lot harder to sell cool pin loom patterns if people can't find pin looms! 

We always had an agreement-- that when people asked me where to find looms to match my patterns, I could point them towards the Hazel Rose Loom booth out on the lawn... and when people were wondering what all they could make with her extraordinary variety of looms, she could mention the Pin Loom Weaving books available at my booth. 

I know that we will be back at fiber conferences in another year or two, but in the meantime I talked to Hazel about our meetings and learned a little more about what she's been doing. 


She reminded me of the lap blankets that I made using her 12" triangle loom along with 4" squares. I actually used two ends of worsted weight yarn to weave the triangles in order to get the same tight weave that you see in the 4" squares. 

Hazel noted that she had put together a really fun weave-along on at the Pin Loom Weaving Support Group, which people had enjoyed. I saw a bunch of the finished items, they were wonderful. We both talk about how much we missed traveling to fiber conferences to hang out and talk with other weavers. I hadn't realized it, but Hazel and Randy have been making looms and traveling to conferences for over 20 years. 

These are my basic Hazel Rose pin looms. While it makes sense to start out with just one or two-- I recommend starting with the 4" and 2" square pin looms, the rectangle looms are a much easier way to produce the various parts for pin loom animals and more complex patterns. 

I have to admit that I now own most types and sizes of pin looms. It took me a while to get over the guilt of having so many pin looms. It helps that they are all very small so that they don't really take up much space (as opposed to my yarn collection which has totally overwhelmed my hobby room and is making advances into what was once the guest room). What moved me past the last of my embarrassment over the number of looms I have is when a friend pointed out that my entire collection still costs significantly less than one small table loom. It's all a matter of comparison. 

I know it may be a while yet before we are all out on the road again. In the meantime it is nice to know that there are fellow weavers out in the world and we can get together through the Looms To Go group on Ravelry and the Facebook Pin Loom Support Group

ps: I have to admit that I love the Facebook Group Name just because it so aptly reflects that we've got all sorts of support from fellow pin loom weavers and that it's kind of an addictive process. MS

Saturday, October 16, 2021

Pin Loom Weaving on the All n One Knitting Loom

I personally believe that any weaving frame that has pins or posts located all the way around counts as a pin loom. 

So while most people are perfectly content to use a knitting loom as a knitting loom, my preference is to look at a knitting loom and say, "Wow, that would make a great pin loom!"

This is a Kb 5/16's All n One Knitting Loom using the two inch side pieces. 


Which is how I came to start weaving pin loom rectangles on a Fine Gauge All n One Knitting Loom from Kb Looms. I had been weaving on the smaller Fine Gauge Original Sock Loom for some time and found it to be a fun, easy process. (All the directions for weaving on knitting loom can be found in Pin Loom Weaving To Go.) But I wanted to be able to make a piece that was longer than 7 inches. The All n One Knitting Loom can weave a piece up to nineteen inches long, more than I needed for this project. 

This scarf is 69" by 8 1/2" and is made up of thirty-one 2 1/4" x 8 1/2" rectangles. I liked the repeating pattern, and was planning to make ten in each color, but then decided to put a dark navy rectangle on each end.  The yarn is Plymouth Yarn Encore acrylic/wool worsted weight. 


This is my All n One Loom while I'm weaving one of the pin loom rectangles. The lovely thing about weaving on it is that while you are producing a simple, pin loom rectangle, you can easily use a wider variety of yarns, especially thicker yarns, because of the wider pin spacing. This also means that it is  easier to pass the needle through the pins. 

Whenever I am weaving on a narrow setting on a knitting loom, I use the Susan Bates five inch weaving needle. It has an enormous eye, it is a bit thicker and much stronger than the normal pin loom needle and it is inexpensive and easy to find. 


This is definitely a cold weather scarf intended for Minnesota winters. I joined it using a mattress stitch, which is amazingly quick. This pattern would work well, maybe better, if it was woven in a DK or light weight yarn, maybe with more variation of color within the blocks.

But let's face it, what is the point in having a larger loom if we can't make larger pin loom squares/rectangles?


This is the Fine Gauge All n One Loom set to it's largest dimensions. I swapped out the two inch spacers for the nine inch extensions so that the weaving area measures 9" x 19". The yarn is YUMMY by The Hook Nook. It is a #5 bulky yarn in acrylic and wool.  

I wove up two pieces in the same size. They measured eight inches by eighteen inches off the loom. Each piece took about 60 yards of the bulky yarn. 

I joined the two pieces to make a cowl. After joining, I pulled up three weft yarns in three equidistant places in order to gather the cowl in a little. 

The result is a simple, very wearable cowl made with great ease on a knitting loom!


Of course, that's not the end of the story. There are endless possibilities with weaving.  This last piece was also woven on the All n One Loom using the extensions. It measures 9" x 12". It has almost twice as many ends per inch as the cowl and that, along with working in the pattern, made it much more challenging to weave. I'm not saying that I wouldn't weave something like this again... but I would have to have a darn good reason for going to so much trouble. 


I feel like I would have been better off moving up to a rigid heddle to accomplish this look. Plus a rigid heddle would have given me the space to make something a bit bigger, so that it could be used as a place mat, or woven in cotton for towels or dishcloths. 

On the other hand, the All n One cowl was so much fun to make that all my relatives may be getting one for Christmas this year. "It's a cowl, Uncle Jim, just deal with it."

Sunday, January 10, 2021

Pin Loom Panda, a new beast for a New Year

It's a new year and like a lot of people, I want to do everything I can to make it better than the last one. So this seems like a great time to introduce a new "adorable beast". The panda is not in the Adorable Beasts book although the bear is-- you can see the difference between them in the picture at the bottom of this post. 

This means that with a few alterations from the original bear pattern found in Adorable Beasts, and with a change of colors of course, you can delight your world with a special panda mascot, or a whole panda family. 


To make a panda you will need the original bear pattern found in the Adorable Beasts book.  (Just look slightly to the right of this post and you will see all the particulars on the book.)  The difference between the Adorable Beasts' bear and the panda is the size of the head and neck. In order to look like a respectable panda, the head must be a larger size than you will see in the original pin loom bear.                 

Follow the directions for the Adorable Beast's bear making these changes--

1. Instead of using 4" x 6" rectangles for the body, make the body using two black 2" x 4" pieces for the front of the body and two white 4" x 4" pieces for the back of the body. 
2. Make the legs just as directed in the book using black yarn. 
3. Make the neck 7" around. 
4. Make the face by using a 3" x 3" square, or use a 4" square--tucking the extra cloth to the inside. 
5. Make the ears in black and add extra large black spots for the eyes. I also made the black nose bigger and more pronounced on the panda.  

These changes in the bear's dimensions seem relatively minor, but they are enough to produce a pretty darn good panda. Enjoy! 

If you have any questions about this process, feel free to get in touch. My email is located in the right hand column at the bottom. You just need to take the spaces out. I would love to hear from you. 
Margaret (Meg) Stump


Monday, December 21, 2020

2020 Mini Sweater Pin Loom Day

It's finally arrived, the perfect prelude to the holidays, Mini Sweater Pin Loom Day. Thanks to Florencia Campos Correa for challenge of organization and photographic work. Check out Gary the Wolf modeling this year's entry in the post right below this. 


If you didn't get an entry in this year-- plan for next year. Heck, you could just make up a great mini sweater over the holidays and have it all ready for 2021. (I bet you could even send the picture to Florencia now, though there is probably no prize for having the first entry in for next year's mini pin loom sweater day.)

Hope your holidays are great. Here's the link to the mini-sweater instructions, just in case you want to get started. 

Wednesday, December 16, 2020

There's still time to weave something for Pin Loom Mini Sweater Day

There are just two more days before the Mini Sweater deadline on December 18. Check out all the details HERE and join in with your own pin loom Mini Sweater. Then check back after the 20th to see everyone's contributions. 


I am not comfortable making a mini sweater without also making a creature who can happily wear the sweater. So this is Gary, who I believe is a wolf, but keeps introducing himself as a coyote. 

In addition to the sweater, Gary is wearing matching board shorts. He reports that he is an outdoor kind of guy and enjoys talking about his feelings and taking long walks on the beach. Considering his report, I'm pretty sure that he is really a wolf. 

Saturday, December 12, 2020

New Felted Purses; use pin looms to create new patterns

Felted pin loom purses have become a new passion for me. They combine all my favorite things, being relatively quick to weave, allowing me to use small bits of yarn (all wool, so they will felt) and then getting to experience the alchemy of felting. Seeing the woven squares, rectangles and triangles meld into perfect objects. 


 Okay, none of them are actually perfect, but they were each very fun to make and will go on to become handy bags around town, or possibly bags that hang in my yarn room, holding yet more yarn or accessories. 

My original plan was to produce bags that could be carried in a folded over shape. But if I had wanted that I should have made them plainer or made a pattern that worked better in the folded position. As it was, these look far better as pictured, so the whole "folded over" idea will have to wait for a future project. 


I am still struggling with adding straps and hardware. I am just learning how important the right leather work is to the piece-- but I find it easy to ignore that work because weaving is so much more fun.  


You may have noticed the woven triangles in the purse on the left. This was my first project with the Wunderwag 4" triangle loom and it worked out really well. (There is a link for Wunderwag Looms in the links list in the right column.) It is so much fun to see the range of patterns that become super doable with the use of squares, rectangles, triangles... plus extra shapes like hearts and the six sided turtle looms. The decorative section on the bag on the right was made with 2" x 4" rectangles to make 2" x 8" rectangles. The edging of each the bags was made using twelve 4" x 4" squares. 

Once sewn together, the bags were felted (actually fulled) by hand using hot-ish water and a little shampoo, agitating them until they got about 20 to 25% smaller and thicker. 

These have proven to be a fun and versatile project, I am definitely going to be making more since it is so easy to make new, different patterns each time. And because it is getting very close to Christmas, I am pretty sure that at least two of these bags will end up as presents, hanging in other people's yarn room. 

Friday, November 27, 2020

The 2020 Pin Loom Commemorative "Dumpster Fire" Christmas Ornament


2020 has been a pretty challenging year. What with a pandemic and politics and quarantines, unemployment and some super-weird theories about what has been going on (yep, I'm looking at you, Q-Anon) this is not a year that many would ever want to experience again. 

But even a terrible year needs to be remembered, and what better image to commemorate the year 2020 than a dumpster fire? 

Here is my take on a special pin loom Christmas ornament made especially for this strange, terrible year. It is easy to make and, considering that you are only going to weave one-third of the flame squares, pretty quick to finish. 

The Dumpster Fire ornament is made with three 4" squares and one 2" x 4" rectangle. If you do not have a 2" x 4" loom, weave another 4" square and fold it in half.  I used two shades of green for my dumpster, you can choose whatever color you want, perhaps a deep blue, to match the local dumpster color. After weaving, I made a single crochet edge on both of the dumpster squares. 

Weave the flames for the dumpster fire. The easiest way to do this is to wind the yarn for a two layer weave rather than the usual three layer weave. Choose some flame colored yarn. I used variegated red yarn alternating with yellow yarn. You are going to make two layers of flame, I used darker reds for the back layer and more yellow in the top layer. 

Warp the first layer as in the normal pin loom instructions. Then turn the loom 180 degrees. Go around the first pin and warp this layer as in the pin loom instructions for the third layer.  This will give you a solid warp, you will be weaving each line (not every other line as with the normal pin loom weaving pattern) one third the way up the square, then stop and tie off your yarn. 

Once these squares are off the loom clip the yarn to better represent flames. Stack the flame squares on top of the 4" back of dumpster and stitch in place. I added a 1 1/2" x 3 1/2" piece of cardboard on top of the flame squares to stiffen the ornament and stitched the cardboard to the woven portion of the flame squares.  

Before adding the front of the dumpster, use a white or light grey yarn to stitch "2020" to this rectangle.  The stitching should not look too perfect, which worked out really well considering my embroidery skills. Use a whip stitch to stitch the top of the dumpster to the back of the dumpster.  Add an 8" crocheted chain to the back as a hanger for the ornament. 


These Dumpster Fire ornaments were so easy and fun to make that I wove a couple more so that several relatives will get their own special remembrance of this very special year. 


Thursday, November 19, 2020

Pin Loom Angels

I was going to call this "Pin Loom Angels for the Holidays" but angels are good for any time of the year. 


Four inch pin loom squares make surprisingly good wings and my plan was to make some angels with sparkly wings by adding sparkly material woven into the squares. The two angels on the left have silver zigzag laid into the first layer finished off with soft, white yarn for a sparkly, fluffy look. 

However making angels is a little like eating chips for me, and I have found that there are lots of angel wings on the market that compliment a pin loom angel. So there is also an angel with rusty, tin wings and one with some sort of sparkly, plastic wings. 

Here is the short form for directions to make the angel, there are more extensive directions for making people in two of my books- Pin Loom Weaving and Adorable Beasts

Each angel is made with six 2" x 2" squares (or one 2" x 4" rectangle for the head and four 2" x 2" squares for the arms and legs) plus one 4" x 4" square for the gown and two 4" x 4" squares for the wings. Fold the square for the gown in half and stitch closed to make a long tube. 

The head is made by stitching a circle on two of the 2" squares, leaving a corner open and turning, and then stuffing. Stitch the head into one end of the gown. Stuff the body with a few layers of quilt batting or other cloth. I used several layers of fleece as stuffing for the body to make these angels. 

Make the arms and legs by rolling the two inch squares and stitching along one side. Attach the arms to the outside of the gown securing with the same color as the gown. Attach the legs by stitching to the bottom of the gown.  Weave two wings using any combination of sparkly and fluffy yarns that you want. Keep in mind that you can wind any difficult to weave yarn on the loom first and then weave through with a smaller, more supple yarn. Tuck in one corner and fold on the diagonal. I choose not to make a perfect triangle because I wanted the two corners to stick out from one another so that each angel is flying with double wings. Stitch the wings to the angel's back as shown in the illustration.

I used a variety of feathery yarns for angel's hair. The hair was added using a small crochet hook, looping a 4 to 6" length of yarn under the scalp and pulling a loop through and making a larks head knot. The final step is adding a little more glittery or colorful yarn for halos and other embellishment. 


One of the fun aspects of making pin loom people or pin loom angels is that yarn comes in lots of colors, just as people, and angels, do. I used wool and acrylic worsted weight yarn for all aspects of the angel body and gown except the hair, which was a lighter, feathery scarf yarn.


These particular angels are going to be visiting several different family Christmas trees, sending love and comfort in a year when I can not take the message in person. But then, that has always been the purpose of angels. 

Sunday, November 8, 2020

Take flight on Pin Loom Wings

These pin loom wings are the product of my background as a mythology geek along with the knowledge that you can make a pretty good little woven wing using a 4" square. The result is a super cool (or super weird?) set of winged hat and heels to meet any occasion, whether you are tasked with bringing a message from a Greek god or just want to lighten your mood. 


This headband/ear warmer style works great in Minnesota winter weather -- and I am pretty sure that it makes you faster on ice skates or cross country skis. 

Other parts of the country may prefer  a cute hat or simpler headband to keep their wings in place. 

The wings on hat and heels is a nod to Hermes, also known as Mercury in the Roman myths. He was known as a message bringer and one who traveled between realms. 

If you want to lighten someone's day, I am pretty sure that their own set of wings for head and heels will do the trick. 

I need to make a slight correction on the above drawing. You may also want to turn in the bottom corner of the wing to make it slightly more aerodynamic as is shown in the wing image below. MS


Have fun with your wings! May they take you on many flights of fancy.