Monday, April 29, 2019
Judy Grant - a fresh look at pin loom weaving
I have a confession to make. This would not come as much of a surprise to people who know me, but I think that pin looms work better and offer far more options for use than many other, bigger looms. But just about the time that I think that I have a handle on everything they can do, along comes someone like Judy to convince me otherwise.
For example, Judy's beribboned scene with rabbit- what an incredible amount of work to do- all before she popped the weaving off of the loom!
This is Judy's Beehive Project, woven primarily on a turtle loom.
I love her bees, beads and pin loom flowers. I would love to be able to add a couple woven bees to her very lovely display piece.
If you like bees and flowers, you can also check out the Bees & Flowers Tea Pot Cozy here.
Monday, April 22, 2019
Pin loom a cotton purse for spring
Weaving with cotton on a pin loom proves a little more challenging than wool or acrylic because the cotton has less give. But you can get the give back by adding a pattern-- which means that you will also be skipping up 30% of the weaving. It goes faster, its just as easy as weaving with wool and you get lovely patterns! Check out two ideas for small purses below and a couple of my favorite pin loom weaving patterns.
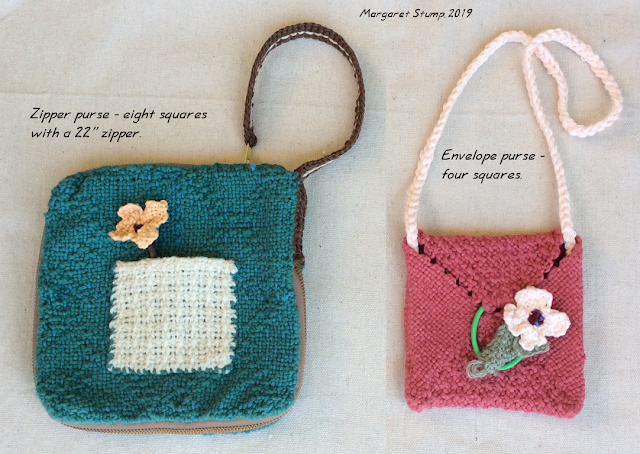
The Envelope Purse is made with four squares plus a couple 2 x 2" squares for the flower and attached leaf. I used an Eight Rib Pattern for the top and bottom squares. The Eight Rib Pattern is shown in my first book, Pin Loom Weaving. The little flower and leaf are attached to the front of the purse. Stitch a hair band to the flap of the "envelope" and loop it around the flower to keep the purse closed. For the handle take two ends of your preferred color of yarn and make a chain. Stitch the ends of the chain to the insides of the purse.
The Zipper Purse was made with eight squares, a block of four each for the front and back. I used a diamond pattern on each square which turned into a lovely "X's & O's" pattern.
I wanted a little bit of dimension to the purse and decided to use a zipper (almost) all the way around. To install the zipper, add a running stitch to the sides- do it more evenly than is shown in the illustration. This makes it very simple to stitch the sides of the bag to the zipper.
This bag is woven with two shades of yarn. I wound a heavier green yarn on to my loom and wove through with a lighter, turquoise yarn.
This is the pattern woven in the green bag. You may have another pattern that you prefer.
Diamond In The Rough pin loom pattern
1R Weave plain
2R U3, O1, U3, O1, U3, O1, U3, O1, U3, O1, U3, O1, U3.
3R W2, U3, O1, U3, O1, U3, W5, U3, O1, U3, O1, U3, W2.
4R U3, O1, U3, O1, U3, W9, U3, O1, U3, O1, U3.
5R W2, U3, O1, U3, W13, U3, O1, U3, W2.
6R U3, O1, U3, W17, U3, O1, U3.
7R W2, U3, W21, U2, W2.
8R Weave plain.
9R Weave plain.
10R Same as row 7.
11R Same as row 6.
12R Same as row 5.
13R Same as row 4.
14R Same as row 3.
15R Same as row 2.
16R Weave plain.
Just for a little more interest, add one square in windowpane lace pattern to the outside of the bag. I love using the Windowpane lace pattern because it is so pretty and yet so simple!
Windowpane Lace pin loom pattern
Row 1: plain weave
Row 2: U3 (under 3 threads); O1 (over one thread); repeat from * across the row, finishing with U3.
Alternate Rows 1 and 2, through Row 14.
Row 15: plain weave
Row 16: plain weave
I turned the the edge of the windowpane lace square down and stitched it in order to make a nice edge to the pocket. This pocket is not very secure unless you add a button or velcro but I added one 2 x 2" flower on a long stem. The purse might look very cute with a bunch of posies blooming from the pocket.
The bag is finished off with a crocheted handle that attaches on each end to the zipper. To make the handle- 1) decide how long you want your handle to be and chain that length. 2) Single crochet down the chain. 3) Single crochet up the other side of the chain. 4) You now have a crocheted band that has a "ditch" in the center. Take a contrasting yarn color and slip stitch up the length of the band. Attach one end of the band to the bag and stitch the other end of the band to the zipper pull and you're done!
Subscribe to:
Posts (Atom)