Tuesday, April 28, 2020

Pin Loom Placemats, a little weaving, a lot of reward.

I recently completed some very usable, resilient placemats by adding in tape-type yarn. I nearly gave this yarn away on the basis that it probably wouldn't work on a pin loom. Luckily instead I misplaced the skein in my yarn room. It turned out that if you just use one layer of the woven tape, it is perfectly weave-able and makes a heavy cloth perfect for a placemat. 


Staying home has offered some wonderful opportunities to rummage through my yarn selection and carry out some simple weaving projects. These placemats were made primarily with worsted acrylic yarn. The secret ingredient that makes them heavy and usable is one layer, about two yards, of the tape-like yarn that is woven into each of the squares. Because it is only one layer of the tape yarn it has proven not that difficult to weave with while maintaining all the merits of this eye catching yarn.

I am going to assume that this particular yarn is no longer being manufactured- on the basis that yarn companies seem to maintain a pretty tight schedule of planned obsolescence. The upside is that, according to Ravelry and other sites 1) there is still a decent amount of this yarn available, 2) even if this yarn isn't available, there will always be other new, wacky yarns to make your placemats unique.


Each placemat was made using twelve 4" squares. I had originally planed to to weave them all using a deep red acrylic yarn for the other two layers and to weave through. However I wanted a little more interest and contrast and the use of the cream yarn for the middle squares added that. The light colored yarn also better highlights the "dots" of woven yarn as shown in the inset of a square above. 


After discovering so much joy in the yarn combination for the placemats I returned to the yarn room to see what other strange or seemingly difficult to weave fibers I might have hidden away. I used one layer of the Lux yarn in two test weavings and really love them both. Again, the secret was only using one layer of the fancy yarn instead of trying to pile too much of it on the pin loom and causing myself all sorts of difficulties. Right now I am working on a scarf using this weaving style with the coffee colored yarn that I can't wait to show everybody in a few weeks. 

That pattern is now available at this Scarf Link!


I couldn't resist adding this final picture of the placemat with matching tea mug. They matched perfectly! Staying home has given me the opportunity to think about and treasure some the simple acts in our lives, like taking time for just hanging and a tea break.

Be well, happy weaving!

Tuesday, April 14, 2020

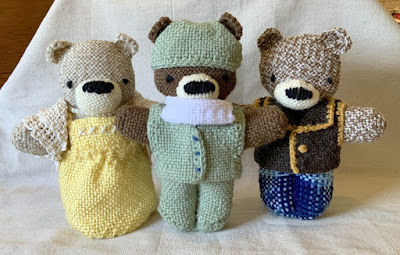
Home is where your pin loom honey bear is

I have been spending a lot of time at home and that circumstance, along with a certain amount of simmering anxiety over what is happening in the world has turned my mind toward the comfort of making pin loom bears. I talked to my daughter about what I might name them and she reminded me of the motto, "Home is where your honey is." Since this is a time when there is a great need to be at home and to be comforted, these are Honey Bears.

The first bear was the girl. If you look closely you will see that her shrug is woven with the same Windowpane lace pattern (and the same cotton yarn) as the cell phone holder.


Making the bears gave me the opportunity to try out a couple new looms. I now have a 1" loom and a 3" loom from Wunderwag Industries. I admit to originally assuming that a 1" loom would have no real purpose, but it turns out that all pin looms are really fun and functional to use.

Once I completed one bear I realized an immediate need for a second bear (that happens a lot to me). Making the bears is particularly easy if you have some very basic crochet skills because then you can use single crochet to "sew" the pieces together, which takes less time and makes a very strong join.

After making the first two, I was reminded (by the dominant news items of each day) of the ongoing challenges being faced by our medical people and it just seemed right to make a Honey Med-Bear, too. 

If you are looking for some comfort in your life you are welcome to try a Honey Bear. There are complete patterns for the Honey Bears at the Pin Loom Weaving Shop.
.


You do not have to have every possible loom in order to make this pattern but you will need at least a 2" and a 4" pin. loom. If you have any questions or comments you can leave them below-- in the comment section or you can get in touch with me. My email is at the bottom of the right hand column, you just have to eliminate the spaces to make it a regular email address. 


Be well. Be safe. Happy Weaving!

Monday, April 6, 2020

Make your own vintage pin loom doll blanket

Staying at home has encouraged me to go through old boxes including some left behind by my daughter. I found a number of dolls and lots of doll clothes plus two now vintage doll blankets. While most of the dolls and accessories will be going to charity (with daughter's blessing) the pin loom doll blankets will definitely stay.

For me, the blankets express the sum of the story of bringing up this child. I can still see her as a two year old with a top knot of flyaway blond hair looking a little like the Whoville girl. And I can see her on Facetime as the joyful, competent woman she has become.

Doll blanket made in a Sunshine & Shadow pattern, each 2" square finished with single crochet and whip stitched together. Two rows of single crochet around blanket. 


If you have any tiny scraps of yarn, you have the beginnings of your own vintage doll blanket. If you have made any projects where some of the squares just didn't work, you may have your doll blanket half completed. Keep in mind that the "vintage" part is only a matter of time.

Looking for a project to take your mind off the present? Make something that evokes the past.

Doll blanket made with 4x4" squares, each finished with single crochet and whip stitched together.

Be well, keep weaving. 

Wednesday, April 1, 2020

Free Pin Loom Rabbit Pattern

It is getting close to Easter, which may feel pretty subdued this year. What better time to make up a few small companions for your Easter basket? This is a free pattern available in the Pin Loom Pattern Shop.


This pattern uses one square to make rabbit ears, head and body. This rabbit is made with one 4 x 4" square for the body plus several 2 x 2" squares for the front and back feet. The rabbit pattern includes a fun, easy pattern for a little carrot to go with the little rabbit. Click HERE or click on the Pin Loom Pattern Shop page to download the free PDF instruction sheet for rabbit and carrot.