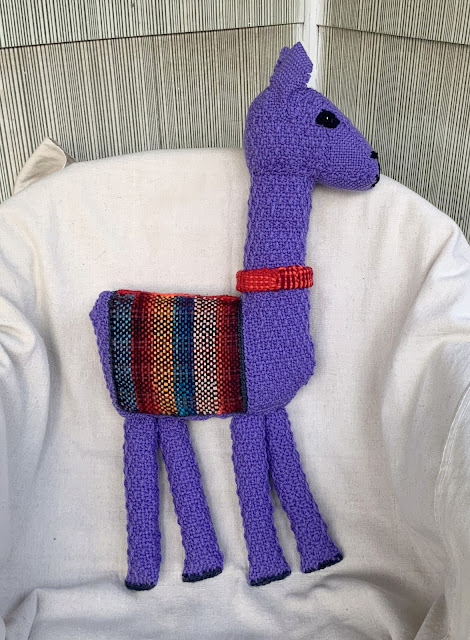
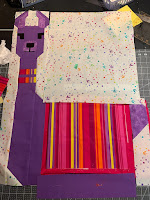
Who needs bunnies and ducks when you can make your own fabulous purple llama for Spring?! Inspiration for this large but delicate creature came from a friend's quilt in the making, intended for a young relative. I think an actual woven animal is a perfect accompaniment.
Showing posts with label Pin loom animal patterns. Show all posts
Thursday, March 10, 2022
A Springtime Purple Pin Loom Llama
This Spring Llama was made from Red Heart Super Saver Yarn. I had most of a large skein and ended up using every bit of it. This is the first time I have worked on a stuffed animal in a larger size-- part of my interest in making the Llama was to try out a 4" x 8" loom that I had unearthed in my (very messy) hobby room. Keep in mind that you can make all the same pieces by joining two 4" x 4" squares. You can see details about the design and construction below.
Because this was designed as a rather large piece, I wanted to weave it as quickly as possible and I also wanted to weave in a pattern to indicate fur. I chose pattern #4 from the old Loomette Weaves handbook that worked out beautifully.
This is an overall pattern that is very easy to weave and, since you are skipping over or under a number of threads, makes the weaving go much faster.
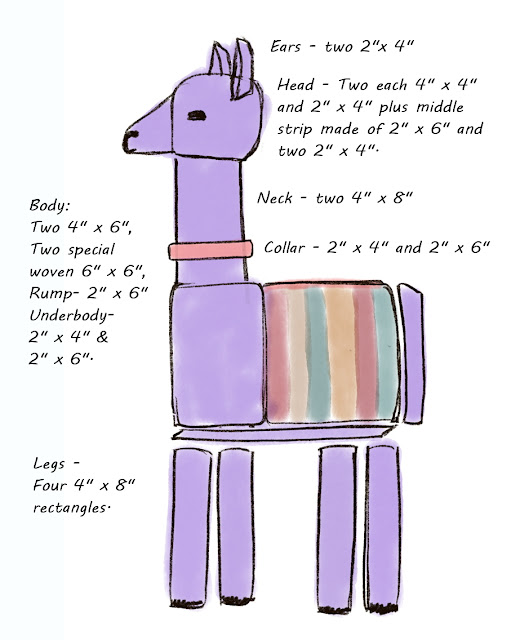
Here are the basic dimensions and woven parts of the of this Spring Llama. Keep in mind that you do not have to have each of the looms that I used to make it, it is easy to join 4" squares or 2" squares to make any of the parts.
I just noticed that I didn't indicate on the pattern that the bottom front of the body should be folded in a little-- check out the picture of the actual llama above. I think that makes it more llama-like.
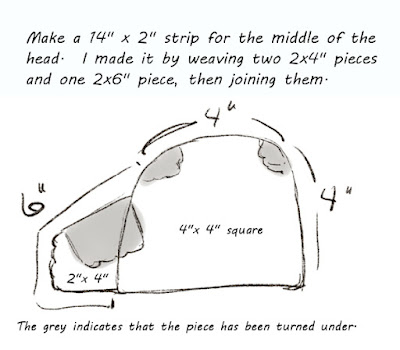
Here is a pattern for the head. The most challenging part of the pattern was figuring out how to make the llama nose. I did it by using a 2" x 4" rectangle, turning some of it to the inside.
The original quilt pattern showed the llama with a colorful blanket on its back, which I definitely wanted to reproduce. I used a 6" x 6" pin loom and wound it in the two layer fashion, in other words, I just wound the warp on the loom and then used a number of different colored yarns for the weft.
Weaving in this manner definitely takes longer than my normal pin loom weaving, but worked really nicely. I finished the two woven blankets with a single crochet in variegated red along the top edge and a single crochet in charcoal along the other three sides. I was hoping that the charcoal edge would make it look like a shadow, that the blanket was on top of the llama and I think it worked pretty well.
The feet are also finished with a single crochet edge charcoal. I wove the eyes on my 1" pin loom, they could also have been done in a satin stitch. The nose and eyes are done in black. I added a stitch of white yarn to each eye.
The ears were each made using one 2" x 4" rectangle, stitched together at the top and stitched to the sides of the head. You may have noticed that there is no tail on this particular llama. The reason for that is that I entirely ran out of the purple yarn and any other color would have been too jarring.
After constructing the llama I decided to add a collar. I used the same variegated red yarn as on the blanket and made a 2" x 10" strip. I turned in both edges and stitched them together to create a 1" x 10" collar, which just fit around the neck without looking too tight.
Spring is with us and with Spring comes rabbits and duckies and, of course, purple llamas. Happy Weaving!
Tuesday, February 1, 2022
Year of the Pin Loom Tiger
Today marks the beginning of the Chinese New Year - it's now the Year of the Tiger! I am celebrating by highlighting one of my favorite pin loom animals, the sleek, stately tiger.
If you have a friend who needs a special, heartening gift, make them a pin loom tiger. Tigers are strong, courageous and independent and sometimes we need to be reminded of those qualities in ourselves.
There are two tigers in my book, Adorable Beasts. This is Melvin, who has the fierce eye of an apex predator.
In addition to this woven beast, I am also sharing a picture of the predator that shares our home, our cat, Cheeto. She got that name because when we first got her she was very small and very orange.
Happy Year of the Tiger New Year!
Sunday, January 31, 2021
This Valentine's Day send a Valentine Elephant
This elephant started out intended as a "Good Luck" Elephant. As I was finishing it I realized that we are only about two weeks from February 14 and, while you might choose to change the pattern on his sides to something that features hearts or flowers, this lovely little elephant would make a really special Valentine's gift.
Of course, you could make it even more special by threading a diamond ring on his trunk-- that would really be unforgettable. No, I take that back. That might just come off as pretentious and overbearing. Just go with the elephant, it is heart warming and sincere. And have a wonderful (possibly socially distanced) Valentine's Day.
Sunday, January 10, 2021
Pin Loom Panda, a new beast for a New Year
It's a new year and like a lot of people, I want to do everything I can to make it better than the last one. So this seems like a great time to introduce a new "adorable beast". The panda is not in the Adorable Beasts book although the bear is-- you can see the difference between them in the picture at the bottom of this post.
This means that with a few alterations from the original bear pattern found in Adorable Beasts, and with a change of colors of course, you can delight your world with a special panda mascot, or a whole panda family.
To make a panda you will need the original bear pattern found in the Adorable Beasts book. (Just look slightly to the right of this post and you will see all the particulars on the book.) The difference between the Adorable Beasts' bear and the panda is the size of the head and neck. In order to look like a respectable panda, the head must be a larger size than you will see in the original pin loom bear.
Follow the directions for the Adorable Beast's bear making these changes--
1. Instead of using 4" x 6" rectangles for the body, make the body using two black 2" x 4" pieces for the front of the body and two white 4" x 4" pieces for the back of the body.
2. Make the legs just as directed in the book using black yarn.
3. Make the neck 7" around.
4. Make the face by using a 3" x 3" square, or use a 4" square--tucking the extra cloth to the inside.
5. Make the ears in black and add extra large black spots for the eyes. I also made the black nose bigger and more pronounced on the panda.
These changes in the bear's dimensions seem relatively minor, but they are enough to produce a pretty darn good panda. Enjoy!
If you have any questions about this process, feel free to get in touch. My email is located in the right hand column at the bottom. You just need to take the spaces out. I would love to hear from you.
Margaret (Meg) Stump
Tuesday, April 14, 2020
Home is where your pin loom honey bear is
I have been spending a lot of time at home and that circumstance, along with a certain amount of simmering anxiety over what is happening in the world has turned my mind toward the comfort of making pin loom bears. I talked to my daughter about what I might name them and she reminded me of the motto, "Home is where your honey is." Since this is a time when there is a great need to be at home and to be comforted, these are Honey Bears.
The first bear was the girl. If you look closely you will see that her shrug is woven with the same Windowpane lace pattern (and the same cotton yarn) as the cell phone holder.
Making the bears gave me the opportunity to try out a couple new looms. I now have a 1" loom and a 3" loom from Wunderwag Industries. I admit to originally assuming that a 1" loom would have no real purpose, but it turns out that all pin looms are really fun and functional to use.
Once I completed one bear I realized an immediate need for a second bear (that happens a lot to me). Making the bears is particularly easy if you have some very basic crochet skills because then you can use single crochet to "sew" the pieces together, which takes less time and makes a very strong join.
After making the first two, I was reminded (by the dominant news items of each day) of the ongoing challenges being faced by our medical people and it just seemed right to make a Honey Med-Bear, too.
If you are looking for some comfort in your life you are welcome to try a Honey Bear. There are complete patterns for the Honey Bears at the Pin Loom Weaving Shop.
The first bear was the girl. If you look closely you will see that her shrug is woven with the same Windowpane lace pattern (and the same cotton yarn) as the cell phone holder.

Once I completed one bear I realized an immediate need for a second bear (that happens a lot to me). Making the bears is particularly easy if you have some very basic crochet skills because then you can use single crochet to "sew" the pieces together, which takes less time and makes a very strong join.
After making the first two, I was reminded (by the dominant news items of each day) of the ongoing challenges being faced by our medical people and it just seemed right to make a Honey Med-Bear, too.
If you are looking for some comfort in your life you are welcome to try a Honey Bear. There are complete patterns for the Honey Bears at the Pin Loom Weaving Shop.
You do not have to have every possible loom in order to make this pattern but you will need at least a 2" and a 4" pin. loom. If you have any questions or comments you can leave them below-- in the comment section or you can get in touch with me. My email is at the bottom of the right hand column, you just have to eliminate the spaces to make it a regular email address.
Wednesday, December 25, 2019
Subscribe to:
Posts (Atom)