Showing posts with label pin loom weaving. Show all posts

Tuesday, October 22, 2024

Make Like a (Pin Loom) Turtle

 I have had a LOT of adventures since last posting to this website, and have feel pretty guilty about not sharing with everyone. This is a turtle designed by myself and my daughter, Taylor, as a present to a young lady in order to gift her with a pet turtle that didn't come with a lot of housekeeping duties or salmonella. 

You might notice that this turtle has felted hearts all over its shell-- another upside of a woven animal. 

My favorite aspect of this particular woven turtle is that it can actually pull its head and legs into the shell (with some help from pokey fingers).  


The top turtle shell was woven from two 4" x 6" rectangles that were overlapped to create a dome. The corners of the rectangles were turned under. The head was made with two 2" x 4" rectangles, stuffed. The feet and legs were each made with one 2" x 4" rectangle with the sides turned under to make an approximate 1" x 4" limb. The feet had a little bit of stuffing added to them. I added a darker color yarn on the edge of the feet to look like claws. 

I made room for the retractable head and legs by weaving a 4" x 4" and using it to capture all the stuffing for the shell. That left an open section below where the head and legs are fastened. They can either stick out or be pulled in. I was really surprised at how well it worked. 


Here is one more shot of our intrepid turtle... not actually in her natural environment... since her natural environment is really my yarn room. 

And like this turtle I am going to try to spend more time out of my shell, exploring the world and sharing with others. 

Talk to you soon. Meg Stump


Saturday, February 4, 2023

A Classic Pin Loom Felted Winter Hat

Ann H. is a fellow Minnesotan who shared the story of her long involvement with pin looms, including all the details for making this very classic (double-layered reversible felted) pin loomed hat. You will find a diagram and complete directions for making the hat below. 


Ann has been working in fiber, including deep dives into natural dyes and various forms of weaving, since the 60's. She noted that her pin loom hat came from a magazine at that time. 
She decided to make the hat using some of her incredible selection of naturally dyed wool samples. As you can see she still possesses a whole wreath of samples, each tagged with the dye and mordant that she used to create them.  

As a side note, I believe that I should get a few extra "good life" points for not being tempted to grab the wreath of samples at the end of the interview and run away. Okay, I was a little bit tempted... but I didn't do it. 

Ann noted that she has worn her reversible, felted hat each winter for at least 40 years. It's very warm and comfy and just doesn't wear out. 
I believe that this is the grail of pin loomed hats, the fabled pattern that I have heard about over the years and could never find. 


Here are the important pictures for recreating this classic hat. It is completely reversible, you are seeing both sides of the hat. The two ends of the hat are constructed differently. The blue end consists of six 4x4 squares stitched into a star and tightly felted. The red end consists of twelve 2x2 squares topped with a 4x4 square. 

This classic pin loom hat is made with 49 large squares and 18 small squares. Choose a yarn that will felt well. 
  • The hat is made with 49 - 4x4 wool pin loom squares and 18 - 2x2 wool squares. 
  • Join the squares (I would suggest using the double overcast stitch) to create a tube with the right side out. 
  • Join the squares at the ends of the tube to close the ends as shown in the pictures above. 
  • Fold the closed tube in on itself to create a very large double-sided, reversible hat. 
Now comes that essential step of felting the hat. Ann noted that before she started the felting process, she went through her cupboards and tried a number of different mixing bowls on her head, finally finding one that best fit her head size. These days we also have the option to use a foam mannequin head as a form for the hat. 

Ann felted the hat by hand, using hot water and Woolite. She noted that the felting took quite a while because it was essential to put extra work into the ends in order to shrink them down to a tight, rounded shape. She turned the hat both ways in order to work both sides evenly. Every so often she would stop and try her hat on the mixing bowl, finally stopping when the hat fit snugly over the mixing bowl. 


And here it is, the classic pin loom hat. Now that I have a handle on the pattern I am definitely going to make one. I realize that I could make the hat using just one of the styles on the ends, but I think that I am going to be so curious about the hat that I will want to recreate the two different ends. 


My hat won't be made with hand dyed natural colors, that's beyond my skill level. But I am going to think about what colors I would love most...

Because, let's face it, this hat could last another 50 years!

Please let me know if you are tempted to create this classic hat, too. Or if you already have one in your weaving collection. 

Happy weaving!
Margaret Stump

Thursday, March 10, 2022

A Springtime Purple Pin Loom Llama

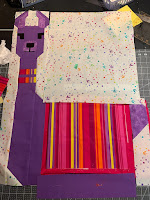
Who needs bunnies and ducks when you can make your own fabulous purple llama for Spring?! Inspiration for this large but delicate creature came from a friend's quilt in the making, intended for a young relative. I think an actual woven animal is a perfect accompaniment.  


This Spring Llama was made from Red Heart Super Saver Yarn. I had most of a large skein and ended up using every bit of it. This is the first time I have worked on a stuffed animal in a larger size-- part of my interest in making the Llama was to try out a 4" x 8" loom that I had unearthed in my (very messy) hobby room. Keep in mind that you can make all the same pieces by joining two 4" x 4" squares. You can see details about the design and construction below. 

Because this was designed as a rather large piece, I wanted to weave it as quickly as possible and I also wanted to weave in a pattern to indicate fur. I chose pattern #4 from the old Loomette Weaves handbook that worked out beautifully.  
This is an overall pattern that is very easy to weave and, since you are skipping over or under a number of threads, makes the weaving go much faster. 

Here are the basic dimensions and woven parts of the of this Spring Llama.  Keep in mind that you do not have to have each of the looms that I used to make it, it is easy to join 4" squares or 2" squares to make any of the parts. 
I just noticed that I didn't indicate on the pattern that the bottom front of the body should be folded in a little-- check out the picture of the actual llama above. I think that makes it more llama-like. 

Here is a pattern for the head. The most challenging part of the pattern was figuring out how to make the llama nose. I did it by using a 2" x 4" rectangle, turning some of it to the inside. 

The original quilt pattern showed the llama with a colorful blanket on its back, which I definitely wanted to reproduce. I used a 6" x 6" pin loom and wound it in the two layer fashion, in other words, I just wound the warp on the loom and then used a number of different colored yarns for the weft. 

Weaving in this manner definitely takes longer than my normal pin loom weaving, but worked really nicely. I finished the two woven blankets with a single crochet in variegated red along the top edge and a single crochet in charcoal along the other three sides. I was hoping that the charcoal edge would make it look like a shadow, that the blanket was on top of the llama and I think it worked pretty well. 

The feet are also finished with a single crochet edge charcoal. I wove the eyes on my 1" pin loom, they could also have been done in a satin stitch.  The nose and eyes are done in black. I added a stitch of white yarn to each eye. 

The ears were each made using one 2" x 4" rectangle, stitched together at the top and stitched to the sides of the head.  You may have noticed that there is no tail on this particular llama. The reason for that is that I entirely ran out of the purple yarn and any other color would have been too jarring. 


After constructing the llama I decided to add a collar. I used the same variegated red yarn as on the blanket and made a 2" x 10" strip. I turned in both edges and stitched them together to create a 1" x 10" collar, which just fit around the neck without looking too tight. 

Spring is with us and with Spring comes rabbits and duckies and, of course, purple llamas. Happy Weaving!

Thursday, October 21, 2021

What to do with all those clipped ends?

 For years I have littered my house with small bits of yarn-- the clipped ends from pin loom woven squares and rectangles. I finally started putting an empty Kleenex box next to my chair in hopes of containing the mess. This receptacle is my next step up from the Kleenex box. 

This was a simple decorative box until I added a hole to the lid. But it has worked so well and been such an elegant improvement in terms of keeping the yarn litter off the floor and out of my vacuum cleaner that I had to celebrate it with everyone! 

Weave on! 

Saturday, October 16, 2021

Pin Loom Weaving on the All n One Knitting Loom

I personally believe that any weaving frame that has pins or posts located all the way around counts as a pin loom. 

So while most people are perfectly content to use a knitting loom as a knitting loom, my preference is to look at a knitting loom and say, "Wow, that would make a great pin loom!"

This is a Kb 5/16's All n One Knitting Loom using the two inch side pieces. 


Which is how I came to start weaving pin loom rectangles on a Fine Gauge All n One Knitting Loom from Kb Looms. I had been weaving on the smaller Fine Gauge Original Sock Loom for some time and found it to be a fun, easy process. (All the directions for weaving on knitting loom can be found in Pin Loom Weaving To Go.) But I wanted to be able to make a piece that was longer than 7 inches. The All n One Knitting Loom can weave a piece up to nineteen inches long, more than I needed for this project. 

This scarf is 69" by 8 1/2" and is made up of thirty-one 2 1/4" x 8 1/2" rectangles. I liked the repeating pattern, and was planning to make ten in each color, but then decided to put a dark navy rectangle on each end.  The yarn is Plymouth Yarn Encore acrylic/wool worsted weight. 


This is my All n One Loom while I'm weaving one of the pin loom rectangles. The lovely thing about weaving on it is that while you are producing a simple, pin loom rectangle, you can easily use a wider variety of yarns, especially thicker yarns, because of the wider pin spacing. This also means that it is  easier to pass the needle through the pins. 

Whenever I am weaving on a narrow setting on a knitting loom, I use the Susan Bates five inch weaving needle. It has an enormous eye, it is a bit thicker and much stronger than the normal pin loom needle and it is inexpensive and easy to find. 


This is definitely a cold weather scarf intended for Minnesota winters. I joined it using a mattress stitch, which is amazingly quick. This pattern would work well, maybe better, if it was woven in a DK or light weight yarn, maybe with more variation of color within the blocks.

But let's face it, what is the point in having a larger loom if we can't make larger pin loom squares/rectangles?


This is the Fine Gauge All n One Loom set to it's largest dimensions. I swapped out the two inch spacers for the nine inch extensions so that the weaving area measures 9" x 19". The yarn is YUMMY by The Hook Nook. It is a #5 bulky yarn in acrylic and wool.  

I wove up two pieces in the same size. They measured eight inches by eighteen inches off the loom. Each piece took about 60 yards of the bulky yarn. 

I joined the two pieces to make a cowl. After joining, I pulled up three weft yarns in three equidistant places in order to gather the cowl in a little. 

The result is a simple, very wearable cowl made with great ease on a knitting loom!


Of course, that's not the end of the story. There are endless possibilities with weaving.  This last piece was also woven on the All n One Loom using the extensions. It measures 9" x 12". It has almost twice as many ends per inch as the cowl and that, along with working in the pattern, made it much more challenging to weave. I'm not saying that I wouldn't weave something like this again... but I would have to have a darn good reason for going to so much trouble. 


I feel like I would have been better off moving up to a rigid heddle to accomplish this look. Plus a rigid heddle would have given me the space to make something a bit bigger, so that it could be used as a place mat, or woven in cotton for towels or dishcloths. 

On the other hand, the All n One cowl was so much fun to make that all my relatives may be getting one for Christmas this year. "It's a cowl, Uncle Jim, just deal with it."

Monday, August 31, 2020

Pin Loom Weaving on a Flexee Link Loom


One of my recent interests has been a practice of pin loom weaving on fine gauge knitting looms. My second book, Pin Loom Weaving To Go, has a whole section of projects and techniques using a fine gauge adjustable sock loom. You can see more information on that process on the Weaving on a Knitting Loom page. 


While I will never give up my favs, the traditional groups-of-three-pins pin looms, it is so much fun to begin to realize that if you can find some sort of frame with pins all the way around, you can wind on the yarn (or rope, I guess, if it was a really big frame) and create a piece of woven cloth with a finished selvedge all the way around. 

After working on the article for Kb Looms about making a cool zippered bag on a knitting loom, they were kind enough to send me their newest product, the Flexee Loom Links. As you can see they are links, some straight and some rounded, with a couple knitting loom pins on each and they snap together to make whatever size knitting loom the knitter wants. They remind me a bit of the old pop beads that were popular a looong time ago. 

One of the cool things about them is that the kit contains 16 straight links which fit together in a nice, rigid manner so that you can shape a small pin loom with them, which means that you can shape a number of different small pin looms depending upon your pin loom needs. 

These are the four looms I formed using the straight Flexee Links, three of which were used to make a Loom Bloom because pin loom flowers are such an easy, fun project. As soon as Kb Looms posts the complete article online - including a weaving video! - I will add the link RIGHT HERE. 


Here are some shots of winding yarn on each loom shape, keep in mind that they all weave up exactly like the adjustable sock loom


Now I am going to guess that a lot of you are already thinking about the fact that this kit contains both straight and rounded links and while the straight links give you a straight, rigid loom, the rounded links would allow you to make a rounded loom. If you add straight and rounded pieces you could make all sorts of shapes including a heart.


Here are my first heart pin loom attempts. I will be adding material on making two sizes of heart looms and weaving heart shapes, including new video, in the very near future. Let me know if you have any questions and I will try to address them.

So take care, stay tuned, I will be back with the completed links and more information soon. MS

Wednesday, July 15, 2020

Pin loom weaving on a knitting loom


Make this zippered bag using a Kb fine gauge knitting loom. All the directions for weaving and creating these bags are at the Kb Loom site. 


Plus you can find directions for weaving on a knitting loom on a new page - Weaving on a knitting loom. 


Get way more information on knitting loom projects, potholder loom projects, make-your-own 2" pin loom projects and a lot of other stuff in Pin Loom Weaving To Go. 

One of the (many) things that I like about pin loom weaving is that when I get bored with one form of it, I can move on to another. I have recently taken a deep dive into weaving on a knitting loom, which has been extremely fun and has opened up a relationship with pin loom people and knitting loom people who have now have the opportunity to see their looms in a whole new way.
More projects to come. The two scarves below were both made using Kb's All In One Loom. This first stripey look was woven with the All In One loom in the narrow set up. The second scarf was woven using the loom extenders.  Details on both projects will be available soon.

In the meantime, check out Pin Loom Weaving's new page - Weaving on a knitting loom - and have a whole new pin loom weaving experience!


Saturday, June 13, 2020

Pin Loom Shark Mittens in Little Looms 2020

Easy Weaving With Little Looms 2020, the principal magazine for small looms, is now available and features FIVE super cool pin loom projects including one that I am really proud of, the Pin Loom Shark Mittens-- because I made them. 


Easy Weaving with Little Looms has been published for several years now. It is interesting to note that the issues have grown, offering more unique patterns for small looms, and that the number of pin loom patterns continues to increase. [Sending a celebratory high five to pin loomers everywhere.]

If you haven't seen the magazine yet, please follow the link above and check it out. In addition to these three items, there is an incredibly cute pin loom raccoon pillow and a charming baby onsie, as well as a whole bunch of extremely cool rigid heddle, inkle, and other small loom projects. 

It was never my plan to identify as "the pin loom person who makes animals" but I am very proud of these mittens because they are warm and comfortable as well as funny and cute. I am also pleased to find that its possible to create a variety of mitten patterns using pin looms. As we are all learning, there are incredible worlds beyond scarves and blankets using these little looms.


Dum-dum, dum-dum, dum-dum, dum dum dum dum dum dum ... [background shark music]  

Be well, happy weaving!

Tuesday, May 26, 2020

Weave a Pin Loom Lovey in velvety yarn


So here is another post about something that I was pretty darn certain that I couldn't do. Shortly before the "sheltering at home" began, I was roaming wildly through Joanne's looking for interesting yarn. I grabbed up one of those enormous skeins of Bernat's Velvet yarn because it was so soft and lovely that I could not resist it--assuming that I would be using it on my rug loom or potholder loom.

I decided to try it on a regular 4" pin loom with no expectation that I could manage it and something wonderful happened. This lush beautiful yarn squashed easily to create a thick, perfect velvet square.


This is not a yarn that I would suggest for first-timers because it is very difficult to see where you are weaving. But if you have woven on a pin loom for a while and know the feel of the weaving pattern, you will find that the yarn's thin core gives the needle very clear feedback so that you can weave with some ease. I found that I had to hold the loom up to a light to make sure of where to start some of the lines, but that the lines were much easier to weave than expected.

One weaving note: I habitually use a fork to tamp down each line before weaving the next and that becomes even more important when weaving with such a thick yarn. But unlike most bulky yarns, this velvet yarn stays tamped down to produce this amazing velvet cloth.


Once I found that I could make these soft velvet squares, I decided to turn them into cozy velveteen loveys. A lovey is a small blanket, often with an animal head, that serves the same purpose as a teddy bear or other comfort object for a baby or small child.

Each lovey is made using sixteen 4"x 4" squares to make a little blanket with the animal head attached on the diagonal to one corner. I used a double overcast stitch to make as seamless a look as I could. The arms and head are made with 4" squares, the rabbit's ears are 4" squares and the bear's ears are 2" squares. I used a square of cream colored cotton chenille to make the animal muzzles. 

The bear's eyes and nose were cut from a 2" x 2" black wool square that I first felted. After cutting out the pieces I stitched around and over them with more black yarn. The rabbit's eyes are small buttons which I would NOT recommend if a lovey is going to a baby or child under three. 


These squares have been so much fun to produce that I can see more and bigger projects down the line-- like an Amish or Navaho inspired lap blanket made with this velvet surface. I can think of a number of people in my life who would appreciate it and its going to be so much fun to make!

Tuesday, April 28, 2020

Pin Loom Placemats, a little weaving, a lot of reward.

I recently completed some very usable, resilient placemats by adding in tape-type yarn. I nearly gave this yarn away on the basis that it probably wouldn't work on a pin loom. Luckily instead I misplaced the skein in my yarn room. It turned out that if you just use one layer of the woven tape, it is perfectly weave-able and makes a heavy cloth perfect for a placemat. 


Staying home has offered some wonderful opportunities to rummage through my yarn selection and carry out some simple weaving projects. These placemats were made primarily with worsted acrylic yarn. The secret ingredient that makes them heavy and usable is one layer, about two yards, of the tape-like yarn that is woven into each of the squares. Because it is only one layer of the tape yarn it has proven not that difficult to weave with while maintaining all the merits of this eye catching yarn.

I am going to assume that this particular yarn is no longer being manufactured- on the basis that yarn companies seem to maintain a pretty tight schedule of planned obsolescence. The upside is that, according to Ravelry and other sites 1) there is still a decent amount of this yarn available, 2) even if this yarn isn't available, there will always be other new, wacky yarns to make your placemats unique.


Each placemat was made using twelve 4" squares. I had originally planed to to weave them all using a deep red acrylic yarn for the other two layers and to weave through. However I wanted a little more interest and contrast and the use of the cream yarn for the middle squares added that. The light colored yarn also better highlights the "dots" of woven yarn as shown in the inset of a square above. 


After discovering so much joy in the yarn combination for the placemats I returned to the yarn room to see what other strange or seemingly difficult to weave fibers I might have hidden away. I used one layer of the Lux yarn in two test weavings and really love them both. Again, the secret was only using one layer of the fancy yarn instead of trying to pile too much of it on the pin loom and causing myself all sorts of difficulties. Right now I am working on a scarf using this weaving style with the coffee colored yarn that I can't wait to show everybody in a few weeks. 

That pattern is now available at this Scarf Link!


I couldn't resist adding this final picture of the placemat with matching tea mug. They matched perfectly! Staying home has given me the opportunity to think about and treasure some the simple acts in our lives, like taking time for just hanging and a tea break.

Be well, happy weaving!