Sunday, December 29, 2013

Bigger than a mug rug smaller than a blanket; making small blankets or pillow tops

This is a note about small to medium-sized flat items. I love making pin loom blankets-- but they take a really long time to weave. Sometimes it feels good to make something that offers a more immediate payoff.
Amish Style Doll Blanket

My favorite bigger-than-a mug-rug items are pillow tops and doll blankets. Both aim at moderate size, 12" square to 18" square. Both can be completed pretty quickly, which means that you can move from conception to gift giving in a week or so.

I made example to the right to accompany the Amish Style doll. Below it is another, even better example of a doll blanket made by wondertrading using 2" x 2" squares, made on a 2" Weave-It.
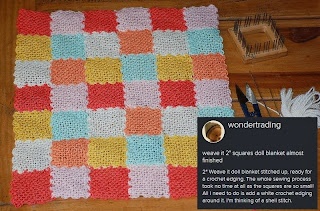
by wondertrading, 2010.
Anything that we call a doll blanket can just as easily be used as a pillow top, a wall hanging or an inset in a larger blanket.  

Speaking of Pillow Tops

Summer Pillow Top
The following two items were specifically made as pillow tops although it is more likely that they will end up as mounted hangings. By "mounted" I mean that my plan is to buy a couple 12" x 12" canvases and mount them using a spray-on fabric adhesive and staples around the edge.

On the other hand, I am fascinated by the idea of completing a series of woven pictures that displays several seasons. These two pillow tops were intended to show approximately the same image as it would change through summer and winter. It would be easy to do the same through summer, winter, spring and fall. Because all of the squares are 4"x4", these would be a great project for a Zoom Loom or other 4" pin loom.

Winter Pillow Top
Here is some construction information on the pillow tops. I used a single crochet edging around each of the squares and joined them with a whipstitch. I edged each pillow top with half-double crochet. If I were to do them again I would edge them with single crochet. The embellishment is free-hand, except for the crowns of the trees in the Summer pillow top, those are little crocheted circles with some tiny stitches in a lighter green on top.


One feature of pin loom use is that you can wind on a variety of colors to achieve different effects. I made the green stripes on the Summer pillow top by winding on two layers of dark green yarn, then winding one layer of light green yarn and weaving in the same light green.

The winter sky is made with the same striping technique, except the first yarn was a variegated blue/white and the second was white. I also worked pretty hard, selecting and sniping sections of yarn, to make sure that the designs were somewhat centered.


Four Seasons Medallion Throw, draft--not to scale.


I love the way that pin loom projects fit together so well. Each completed pattern is a 12" square.  I could see these two 12" pieces, along with two more representing spring and fall, serving as medallions, surrounded by an edging of 4" x 4" squares other borders and turning into a great little blanket or throw.

Well now I'm excited about them again. It may be a while before I can pick up on this project, but I'm going to do it someday. I think it could have a nice retro "Currier and Ives" feel to it. It would make a great present for someone that you cared a great deal for -- because there is a lot of weaving and work in it.  However, this is also a great example of a group project, one that can be shared out with siblings and cousins, so that it not only represents the quality of seasons, but also the quality of family.


Saturday, December 21, 2013

Pin Loom Earplug Holder

This is exactly how the ear plugs
looked when they came out of the
bottom of my bag.


 I go to a fitness center where everyone wears earplugs. I also wear earplugs when I'm there because I am trying to fit in and because I can listen to the TV while I put in my one-quarter to one-half mile trudge on the treadmill.

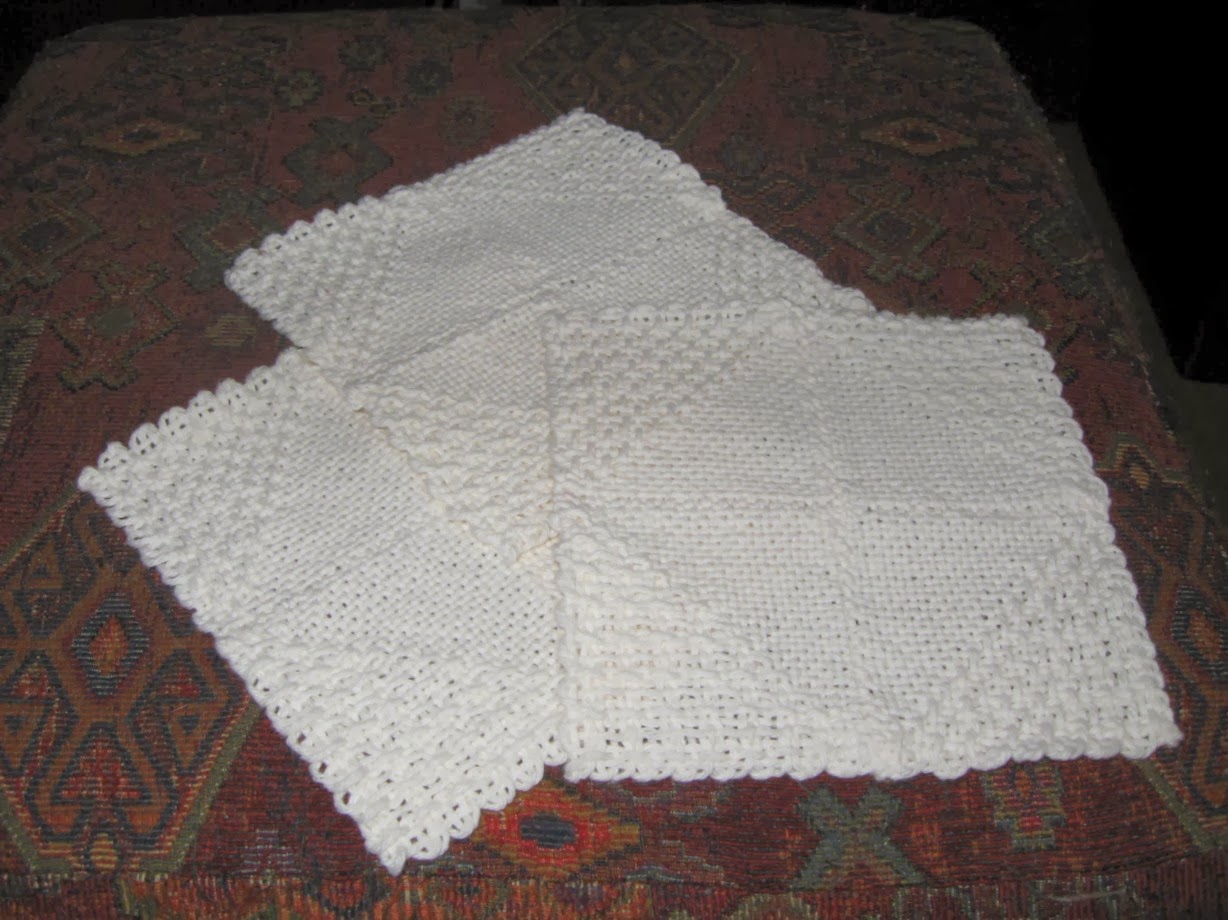
Unlike many people, however, I do not wear my earplugs all the time. And that's a problem because when I go to get the earplugs, they look like this -------------------------------------------------->


Considering that a major focus in my life is looking for things to make with weavies, this immediately became a weaving challenge. Obviously I needed, in my husband's words, an ear plug cozy.

So this is what I made:

 
The Pin Loom Ear Plug Holder is made using a 2" x 6" weavie. If you don't have a 2" x 6" loom, you can make 3) 2" x 2" weavies and join them together in a circle to create the holder.

Place the earplugs on each side of the weavie "donut" and secure them by wrapping the wires around the outside, tucking the plug inside to keep it all in place. Not a lot of technology here, but it really works.

My plan is to make several ear plug holders for son, daughter, niece and nephew stocking stuffers on the assumption they have to take off their ear plugs eventually... don't they? 


This is the kind of tiny project that invites the use of small bits of particularly glorious yarn.

I used some variegated tweed that makes a good match with the ear plug wires.

I used a very simple looping stitch to join the two ends of the weavie.

Wednesday, December 18, 2013

Gift idea - Pin Loom Wash Cloths

A number of my family members will be getting herbal soap accompanied by hand woven wash clothes for Christmas. I have never really gotten over the belief, ingrained as a child, that the most heart felt gift was one that was made by hand.  I'm not making the soap, I figure you have to pick your battles, but I am making the wash clothes, which are turning out far better than I expected.


I lucked upon a cone of Sugar and Cream cotton yarn, 706 yards (646 m), for ridiculously low price. That is a lot of hand made wash clothes. Actually, I just stopped and figured out the number. There are four woven squares in each wash cloth.  Each woven square takes 7.5 yards (6.9 m) plus a yard (.9 m) for joining. So each wash cloth is 31 yards (28 m) which means that I could make about 23 wash clothes from that one cone. I realize that a handmade item can't be all about the savings but sale items often encourage creativity for me.

I used a weaving pattern that was popular for both the Weave-It and the Loomette.

DIAGONAL HALF SQUARE 

Row 1: Weave plain.
Row 2: U3, O1, U3, O1, U3, O1, U3, O1, U3, O1, U3, O1, U3, O1, U3.
Row 3: W2, U3, O1, U3, O1, U3, O1, U3, O1, U3, O1, U3, O1, U3, W2.
Row 4: W4, U3, O1, U3, O1, U3, O1, U3, O1, U3, O1, U3, O1, U3.
Row 5: W2, U3, O1, U3, O1, U3, O1, U3, O1, U3, O1, U3, W6. [5]
Row 6: W8, U3, O1, U3, O1, U3, O1, U3, O1, U3, O1, U3.
Row 7: W2, U3, O1, U3, O1, U3, O1, U3, O1, U3, W10. [4]
Row 8: W12, U3, O1, U3, O1, U3, O1, U3, O1, U3.
Row 9: W2, U3, O1, U3, O1, U3, O1, U3, W10. [3]
Row 10: W16, U3, O1, U3, O1, U3, O1, U3.
Row 11: W2, U3, O1, U3, O1, U3, W18. [2]
Row 12: W20, U3, O1, U3, O1, U3.
Row 13: W2, U3, O1, U3, W22. [1]
Row 14: W24, U3, O1, U3.
Row 15: W2, U3, W26.
Row 16: Weave plain.
"WEAVE 22" from "Original Loomette Weaves." Los Angeles, California: Cartercraft Studios, 1937, and "Weave-It Weaves." Book No. 1. Medford, Massachusetts: Donar Products, Corp., 1939.

One further choice. 

When I started making the wash clothes, I finished off the first two with a line of single crochet. Then it hit me, there was no real need to add a crochet edging. One of the interesting aspects of the weave-it is its finished edge and I have found that I rather like the scalloped, lacy edge. However,when I make dish clothes (which is what I am going to do with the two on the right) having that extra single crochet edging makes sense. Perhaps next time I make dish clothes I will use a half-double crochet for a thicker, more structured edging.


Please keep in mind that you are seeing the washcloths straight off the loom. They will shrink and soften with washing.

Wash cloth squares on and off the loom.

.  

Monday, December 2, 2013

Pin Loom Advent Calendar, part I

I didn't fill in all the numbers
but you get the idea.


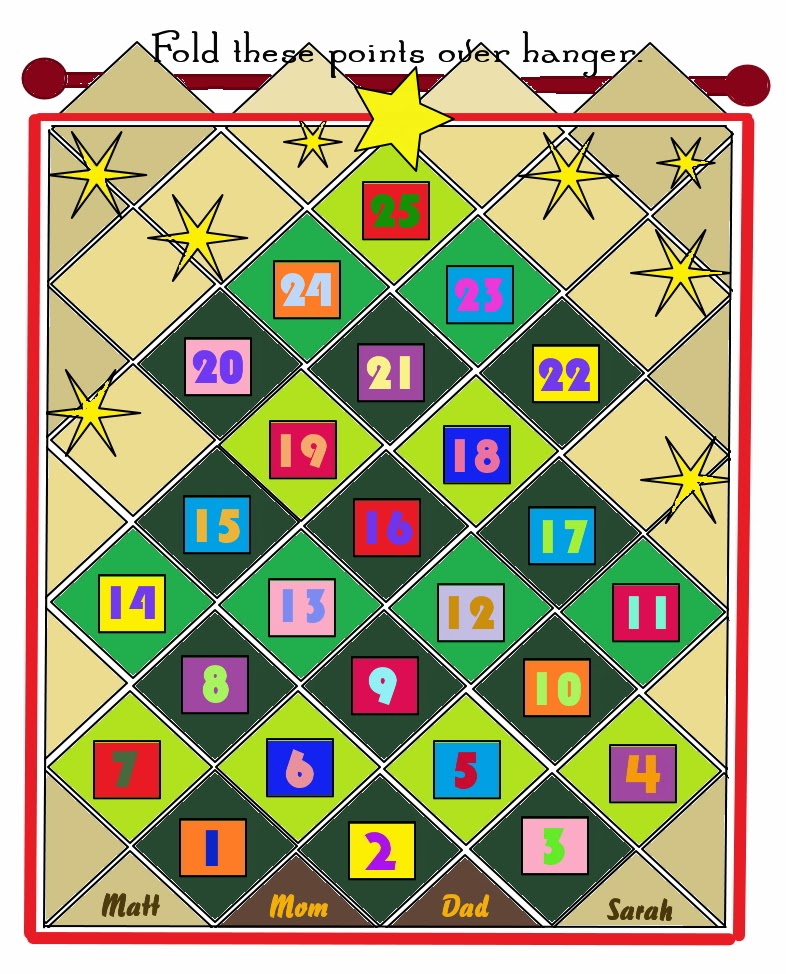
Christmas brings forth my best intentions and designs, such as plans for a Pin Loom Advent Calendar that has been in the works for a number of years. I am getting closer. The green 4" x 4"squares for the banner and the 2" x 2" multicolored squares for little pockets for treats are all woven and waiting to be assembled. My original plan called for a simple grid, which is a perfectly acceptable way to put together the calendar, but seemed boooring.

Here is the newer plan, still in the formative stage. Proof that I'm basically a "nothing succeeds like excess" kind of gal.

This Advent Calendar calls for 25 green squares as well as 24 background squares in a variety of neutral colors. It measures approximately 20" wide by 30" high. In the real hanging the green squares will be a little more random. My plan for the numbers is to use short lengths of brightly colored nylon cord, attaching them with hot glue and then binding them in place with micro-filament thread.  The skinny yellow stars will be yarn embellishments. I am not sure how I am going to make the top star on the tree, I might change it out for a pin loom angel. 

Although it will be too late to use the Advent Calendar this year, I will continue to work on it. I hope to share pics of the actual weaving in  Pin Loom Advent Calendar, Part II.

From the little bit of experimenting that I have done so far on the real squares, it looks like I will need to make a number of changes to this plan including adding more ornaments to the tree and throughout the hanging. One idea that I hope to initiate with this project is making small ornaments out of felted weavies. After all, what better medium for felting than small woven squares? 

Wish me luck. Meg