Showing posts with label Christmas gift. Show all posts

Sunday, November 8, 2020

Take flight on Pin Loom Wings

These pin loom wings are the product of my background as a mythology geek along with the knowledge that you can make a pretty good little woven wing using a 4" square. The result is a super cool (or super weird?) set of winged hat and heels to meet any occasion, whether you are tasked with bringing a message from a Greek god or just want to lighten your mood. 


This headband/ear warmer style works great in Minnesota winter weather -- and I am pretty sure that it makes you faster on ice skates or cross country skis. 

Other parts of the country may prefer  a cute hat or simpler headband to keep their wings in place. 

The wings on hat and heels is a nod to Hermes, also known as Mercury in the Roman myths. He was known as a message bringer and one who traveled between realms. 

If you want to lighten someone's day, I am pretty sure that their own set of wings for head and heels will do the trick. 

I need to make a slight correction on the above drawing. You may also want to turn in the bottom corner of the wing to make it slightly more aerodynamic as is shown in the wing image below. MS


Have fun with your wings! May they take you on many flights of fancy. 

Monday, July 8, 2019

Dr. Who Pin Loom Scarf

I don’t know how much overlap there is between pin loom weavers and Dr. Who fans, but I am a major weaver/Dr. Who overlapper.

When I stumbled across the website, Dr. Who Scarf, I knew that I wanted to weave my very own homage' to the original, knitted, Dr. Who Scarf. I wanted it to be as close to the original colors and design as I could get— without having to do any knitting.

For those who might not remember (or not have been born at that time) Tom Baker portrayed the Fourth Doctor Who from June, 1974 until March, 1981, which was the longest appearance of any one actor in the role of Dr. Who.

One of his most recognizable features was a very, very long scarf.

The Dr. Who Scarf website was extremely helpful by giving specific colors needed as well as a layout for the design. The original scarf was 10” by 13 foot with fringe -- which stretched to about 17 foot over the years. My recreation turned out to be 11 foot, 6 inches without fringe. I’m pretty short and decided that fringed scarf ends would end up acting too much like a dust mop.

To create the color blocks, I used 4x4” and 4x6” pin looms to make blocks 10” across. There are several sections that measure 8” x 10”, where I used multiple blocks of the same color. For thinner color blocks, I used 2x4” and 2x6” looms. For even thinner sections, I single crocheted 3 rows back and forth for an approximate 1” x 10” section.

I joined the blocks and all the color sections using a double overcast stitch. You can find information on this stitch on the Pin Loom Essentials page as well as a demonstration of using the double overcast stitch on the Pin Loom Video page.

I decided to limit my yarn choice for the project to what I had available in the house (which is not a ridiculous limit since I’ve got about two rooms full of yarn-much of which has come to me second-hand through various thrift stores). I found a very close match to all but one color in worsted weight wool. I had to use an acrylic yarn for the chestnut color.

This is the scarf laid out flat on the ground
pictured in sections.
When I started weaving and putting the stripes together I was blown away by how the color palette reeked of the 70’s. It dawned on me that my color choices may have been helped by the fact that some of the yarn I was using could have been spun in the 70’s. I may have been using the original colors!

This scarf project turned out to be the perfect choice for several weeks of travel. Since I had a clear diagram, with my modifications, from the irreplaceable Dr. Who Scarf website, I could pick up and do a few squares whenever I needed something to do with my hands. Because I was weaving in different sizes and colors, it was never boring and the project took shape surprisingly swiftly.

It was only after I finished the scarf that I did some further investigation and found that there are a number of people actively knitting, and selling, Dr. Who scarves. However, none of them are woven on pin looms, which I still consider the absolute best, and most fun, fiber technique.

Wednesday, September 19, 2018

Introducing Suzanne Eakin, pin loom weaver, crocheter, creator

The entire title of this post is "Introducing Suzanne Eakin, pin loom weaver, crocheter, creator with a special shout out to Noreen Crone-Findlay, the ultimate weaver and artist" but I didn't have room for it.

Suzanne has been making some incredibly creative little characters that could light up the day for many. I so appreciate that she agreed to share some of her creations with me.


These incredible little teddies are made with 2" and 4" squares using Noreen Crone-Findlay's teddy bear pattern that she demonstrates using a woven potholder square. Suzanne noted that she did add a line of single crochet to the ears to give them greater definition. You can see Noreen's original pattern here. Not only are the bears really cute, but I love the clothes (can you believe it... lederhosen!?) she has designed for them. 


Suzanne shared her take on my pin loom rabbit pattern. You can get a free copy of rabbit pattern, complete with carrot, here. Suzanne made a wonderful touch by adding black beads for the eyes, and I love her little crocheted leaf bed as well. 


Here's another use of black beads on a woven frog. Suzanne explained that she used much the same technique as with the rabbit, changing the shape a little and adding crocheted frog legs. But that's just the beginning.

Suzanne suggested more great items to get ready for Christmas. 


Confetti yarn!  Weave your own decorated tiny Christmas tree. Weaving with gold lame thread - just the touch for an angel's wings. (I once made angel's wings by weaving in microfilament, i.e., fishing line, and I do mean just once. It was the hardest thing I have ever woven and Suzanne's idea of using gold thread is way better. )


Angels and Christmas trees and the beginning of some exquisite presents. 


I think this one is my personal favorite. Crochet and pin loom weaving go together like peanut butter and jelly... or at least like peanut butter and bananas.  A round of applause for Suzanne! Thank you so much for sharing. 

Sunday, December 3, 2017

Pin Loom Travel Tags -or- how to keep a watch on your luggage.

Since about 93% of all luggage carried these days is the same style and color, many people decorate their suitcase with a pink ribbon or bright tag. This makes a great opportunity to add a pin loomed touch to your travel and upcycle a thrift shop find-- like an old watch or bracelet.

This project requires two 4x4" squares and a watch with a band or other jewelry with a strong clasp. Take the watchband off of one side of the watch and attach the two halves of the watch to two squares. Then sew the two squares together to form a pocket. Drop your name and address into the pocket, it will be safe in there in case its needed, and buckle the watchband around the suitcase handle. Now there will be no question about identifying your luggage with ease.

(Though it would be fun if we all did this and then ran into one another at the baggage claim... Finally, a way to identify other pin loom weavers!)


It goes without saying, although I'm saying it anyhow, that you need to choose a watch that is no longer working. If you use one that is still running I can pretty well guarantee that it won't be working by the time you claim your luggage. If anyone is wondering at this point, "why a watch?" I think it would be a fun, funky use for an old watch and it comes with its own strap.

Once your start making these little woven pockets you may decide that they are perfect for gift cards, tree decorations and backpack embellishments. I like the idea that you can make them with some ease and match the gift recipient's favorite colors. If your plan is to give some cash for Christmas, this makes a great way to give them a thoughtful, personal gift and still let people get what they want. 

Saturday, November 25, 2017

A pin loom Gnome for the holidays!

I'll be Gnome for Christmas... Gnome Sweet Gnome... There's no place like Gnome for the holidays...  


PATTERN DIRECTIONS FOR A PIN LOOM GNOME


This is a pattern that I worked out with the assistance and  encouragement of a fellow Oregon Flock and Fiber participant.
She mentioned that she wanted to make gnomes and we worked out just how fun and easy it would be to weave up Pin Loom Gnomes for the holidays!


This is a fun little pattern that will have pin loom gnomes appearing everywhere this season.

Add them to every sort of holiday decoration, make a few Gnome Wreaths, use them for that last minute stocking stuffer or have them popping out of every corner.

They are so cute and easy to make that its hard to stop.  So I wish you a very Gnomley holiday season!


Friday, January 20, 2017

Pin Loom Mug Rug and Mug Hug (and news of a new book)

It may not surprise anyone to learn that people in my family often get pin loomed presents for Christmas. It's after Christmas now so I won't be ruining the surprise by sharing some pictures and ideas with you.

You have probably guessed that the Mug Rug part of the combo is our own favorite 4"x 4" pin loom square. The Mug Hug aspect is a new pin loom project that I have been experimenting with.  I have found that it is both easy and fun to make pin loom rectangles on a fine gauge sock knitting loom.

Here are some examples of weaving on the sock knitting loom. You'll notice that the one in the middle has a loop crocheted on the end, these were woven and designed as fiber cuffs.  You may have also recognized the loom, its a fine gauge adjustable knitting loom. Which means that it is not only possible to weave rectangles for mug hugs and fiber cuffs, its possible to weave rectangles in a bunch of different lengths all on this one loom!


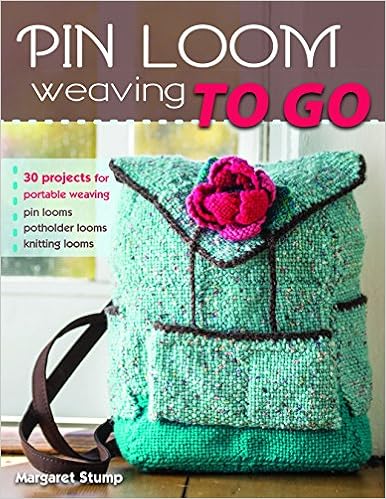
Which brings me to the second part of the story, that the newest book on pin loom weaving, Pin Loom Weaving To Go, will be available in March, 2017.

Pin looms have always thrilled me. I love their ease and portability. I love the fact that each square is complete in itself, that when you take them off the loom they don't ravel or unwind.

In Pin Loom Weaving To Go we will explore using that same pin loomed approach to weave on a sock knitting loom and on a regular old potholder loom.  But in each case you will be able to weave a completed square that pops off the loom without the need for any type of locking edge.

I am really excited about this book and I hope you enjoy it too!


Here's a couple more mugs with rugs. :-)


Wednesday, October 19, 2016

Pin Loom Christmas II

Here's a couple more Christmas ideas-- scalable snowflake squares to use for coasters, place mats or a winter throw... plus poinsettias!


Idea #3  Make a snowflake square, then make a bunch more snowflake squares, then turn them into very cool presents. 


These are 4" pin loom squares embellished with snowflake patterns in white yarn.  The top square has a single crochet edge, the bottom square was supposed to have a more "icicle" look.

Here are the directions to crochet the bottom square's icicle edge: There should be one icicle point in each of the double loops. In the first loop, chain 3, sc2 back down the chain, then in the second loop, sc1. Repeat all the way around the square. 

Either style makes a great coaster.  Weave four squares, embellish with four snowflake patterns and you've got a pretty nice hostess gift (or add a bottle of wine for a great hostess gift.) Snowflake patterns are easy to make up or find online.

Or scale it up, turn 12 squares with a variety of snowflake patterns into a winter themed place mat. Make a table runner that is just the right size for your table. Keep in mind that the single crochet edge makes a very pretty join, just whip stitch the squares together.


Make a set of place mats or just keep going and make a cozy winter blanket as a gift for yourself  or someone you really care about (I mean, come on, its going to take a lot of squares).  I would suggest only embellishing a few of the squares so that it doesn't get too busy. Consider using a number of different shades of blue for the larger project to add more depth/texture to the design. 


 Idea #4  Make a pin loom poinsettia as a Christmas pin or to embellish a gift, make a whole bunch of pin loom poinsettias and decorate a tree!


This is a pulled thread pin loom flower, also known as a Loom Bloom, originated by Jana Trent of Eloomination.com fame. It is made with two 4" x 4" squares.

Make the bloom by finding a thread right in the middle of the square and pulling on it to cause the square to pucker in. Then pull on the other thread (you're pulling on one horizontal and one vertical thread) to create four petals. Do the same to the second square and stack the two squares to make a multiple petal flower.

Add a bunch of french knots in yellow and light green to create a poinsettia like look. This sample flower has a 4" green square, folded diagonally, attached to the bottom.


My plan for this sample flower, and the other seven that I'm going to make, is to turn them into holiday napkin rings. The two points of the green square will be joined to make the napkin ring. The cool thing is that people at the dinner can take the flowers home with them, which is really fun.

There is no end to the fun things that can be done with the flower. We've all got a hat or a purse somewhere that could use a little Christmas cheer.

Thursday, October 13, 2016

Pin Loom Christmas

Christmas and other, equally challenging gift giving holidays, are going to be here before we know it. I've been thinking about a number of small, thoughtful gifts I could make but its already clear that I am going to run out of time before the samples are all woven and finished. So instead of putting it off for another year, I am going to list the ideas in the next several posts, using older, finished samples or drawings so that I can share the ideas with you.

Idea #1 Make a woven gift bag that could end up being just as treasured as the gift itself. 


Make a bag in sparkly reds and greens or make it in the recipient's favorite colors. The simplest bag is two 4" x 4" squares, joined together. This sample was made with two squares, each with a single crochet edge in the same color as the square with a contrasting color used to whip stitch them together. The top has a double crochet edge with yarn threaded through for a tie. Here is the pattern for the little heart sewn into the bag. You could just as easily add a little Christmas tree or, as you will see in the next post, a snowflake.


Idea #2 Make a Pin Loom Christmas tree for the holidays. 


Foam cones are available everywhere, they make a fun and easy decorative touch for the holidays. Wrap a foam cone in 4" squares, using colored pins as embellishments. You could add on chains, charms and all sorts of extra decorations. Wrap some smaller cones in yarn to make an entire fiber forest!


Don't forget to check on past posts for ideas on Advent calendars, wash clothes and other heartfelt woven gifts.